
Row-level security is an important part of many data models. In this article, I am showing a way to selectively grant “all” access with dynamic row-level security and only one role. For example, we can let a CEO see the whole data model, but a department head will be able to see their department’s data only. This article presents a more flexible approach in cases where using an organizational hierarchy and PATHCONTAINS would be inappropriate.
Basic scenario
Imagine we have the following fact table called Headcount:
| Region | Headcount |
| Central | 44 |
| East | 27 |
| West | 17 |
We have four users of our report: one manager for each region, and a CEO.
Each regional manager should be able to see their region only, and the CEO should be able to see all regions.
How can this be achieved with dynamic row-level security? There are several ways:
First, we can create a role for regional managers, and a separate role for the CEO. I saw this solution suggested in a Power BI Community forum thread. In my opinion, this approach is not exactly dynamic, as we will have to assign the CEO a separate role.
Second, we can solve this problem using an organizational hierarchy and the PATHCONTAINS function in DAX. While it would work in this particular case, it may not work in case where we need to specify custom access.
Third, we can create the following security table:
| Name | Region |
| Regional Manager Central | Central |
| Regional Manager East | East |
| Regional Manager West | West |
| CEO | Central |
| CEO | East |
| CEO | West |
We don’t need to relate the tables.
Then we can create a role with the following DAX code for Headcount table:
Headcount[Region]
    IN CALCULATETABLE (
        VALUES ( UserSecurity[Region] ),
        UserSecurity[Name] = USERNAME ()
    )
This does the trick, but in more complex situations, where there are many regions and hierarchies are more complex, this would bloat the security table, and maintaining it could be arduous.
Here’s an alternative approach. We can create the following security table:
| Name | Region |
| Regional Manager Central | Central |
| Regional Manager East | East |
| Regional Manager West | West |
| CEO | ALL |
Note how the security table is more concise and easier to maintain. To make it work, all we need to do is change the DAX code for our security role:
VAR Regions =
    CALCULATETABLE (
        VALUES ( UserSecurity[Region] ),
        UserSecurity[Name] = USERNAME ()
    )
RETURN
    OR (
        "ALL" IN Regions,
        Headcount[Region] IN Regions
    )
The same approach can be used in more complex scenarios as well.
More complex scenario
Now let’s say our Headcount table also contains departments:
| Department | Region | Headcount |
| Finance | West | 1 |
| Finance | East | 1 |
| Finance | Central | 2 |
| Marketing | West | 3 |
| Marketing | East | 4 |
| Marketing | Central | 8 |
| Sales | West | 13 |
| Sales | East | 21 |
| Sales | Central | 34 |
We have the following users of our report:
- One regional manager for each region
- Finance Director
- Sales & Marketing Director
- CEO
Here are the business rules concerning security:
- Each regional manager should see all departments within their region only
- Each director should see all regions within their departments only
- The CEO should be able to see everything
Let’s assume we have the following security table:
| Name | Department | Region |
| Regional Manager East | ALL | East |
| Regional Manager West | ALL | West |
| Regional Manager Central | ALL | Central |
| Sales & Marketing Director | Sales | ALL |
| Sales & Marketing Director | Marketing | ALL |
| Finance Director | Finance | ALL |
| CEO | ALL | ALL |
You can appreciate the ease of this approach by noting that a security table without ALL would contain 27 rows instead of 7, even in this relatively simple case.
Here is the DAX code that should be used as table filter for Headcount:
VAR Regions =
    CALCULATETABLE (
        VALUES ( UserSecurity[Region] ),
        UserSecurity[Name] = USERNAME ()
    )
VAR Departments =
    CALCULATETABLE (
        VALUES ( UserSecurity[Department] ),
        UserSecurity[Name] = USERNAME ()
    )
RETURN
    AND (
        OR (
            "ALL" IN Departments,
            Headcount[Department] IN Departments
        ),
        OR (
            "ALL" IN Regions,
            Headcount[Region] IN Regions
        )
    )
This approach can work on dimensions as well. Let’s say you now have the following data model:

Note that UserSecurity is still not related to any table. To make row-level security it work, you just need to split the filters between two tables:
-- Department table filter
VAR Departments =
CALCULATETABLE (
VALUES ( UserSecurity[Department] ),
UserSecurity[Name] = USERNAME ()
)
RETURN
OR (
"ALL" IN Departments,
Department[Department] IN Departments
)
-- Region table filter
VAR Regions =
CALCULATETABLE (
VALUES ( UserSecurity[Region] ),
UserSecurity[Name] = USERNAME ()
)
RETURN
OR (
"ALL" IN Regions,
Region[Region] IN Regions
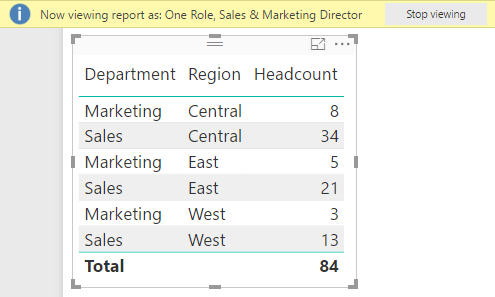
)If you now view the report as Sales & Marketing Director, for example, you will see only Sales and Marketing:
Conclusion
The approach outlined above can be useful when the security table is maintained manually. Writing “all” instead of listing all possible values not only saves time, disk space and RAM, but also future-proofs the solution when new values are introduced. The latter effect, however, must be carefully considered in case it is undesirable.
Download sample files: SecurityAll.zip